Description
Our steel adaptor plate for the mounting of a VW / Audi (VAG) O2M gearbox on a Renault F4R, F7P, F7R or C1J engine block.Designed to work in concunction with our billet steel 240mm flywheel this adaptor plate allows you to mount an O2M 6 speed gearbox on your Renault engine block.
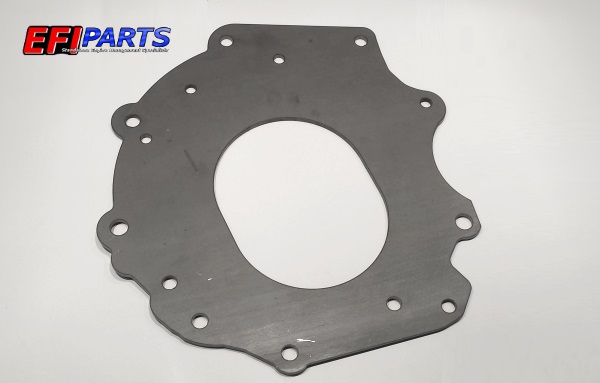
It arrives plain as shown, a bare plate. Mounting to the engine block should be made with M10 high-tensile bolts with sufficient clearance ground out of the bell housing mounting face of the gearbox. It is recommended that a 12mm (M12) stud is welded in to place from the rear of the plate to fulfill the top-left gearbox mounting hole which is not possible with a regular nut & bolt because of interference with the engine block.
This plate is designed to facilitate the installation of an 02M VAG Group gearbox. It should be installed by a competent engineer with special consideration given to correct alignment. A general set of instructions for installation follow;
1. The engine block should be installed on a stand or the ground *with the gearbox mating face pointing upward*
2. The plate is first installed *loosely* with bolts to the engine block.
3. Install your flywheel and with *careful attention* to clutch alignment, install the clutch.
4. Carefully lower the gearbox on to the still upright engine block and allow the gearbox’s input shaft to drop in to the centered clutch.
5. Using M12 bolts (where possible) and M10 bolts secure the gearbox to the mounting plate. Note: using 12mm bolts where possible is important in order to properly align the gearbox. 2x M12 bolts should be used at the top, two long M12’s should be used through the gearbox and through the starter motor (having first drilled the starter motor holes out to 12mm to match the gearbox) and finally a 12mm bolt should be used at the rear of the gearbox near to / behind the output flange. Other bolts can be M10. With some F4R sumps some clearance should be ground for the bottom most bolts.
6. Accurately mark the position of the adapter plate on the engine block (using a scribe, etc.).
7. Remove the gearbox, clutch and flywheel.
8. Having first checked, and if necessary adjusted the position of the plate to match your marks, tighten the plate to the block.
9. At this point I recommend re-fitting the flywheel, clutch and gearbox for another test fit to double check your alignment. You should further check the alignment by rotating the engines crank to make sure it turns the gearbox’s input shaft without resistance. A “tight spot” when rotating suggests there remains an alignment problem. It should turn with even force for the entire 360 degrees of rotation.
10. With alignment verified, the gearbox, clutch and flywheel should be removed again before finally semi-welding (180 degree’s worth) of the gearbox-to-engine bolts to the plate. Weld them in such a way that the weld can be easily ground away should the bolts ever need to be removed. This weld, along with the tight bolts assures that the plate *cannot move* on the engine block during use.
11. Assemble for the final time with the usual considerations given to flywheel mounting bolts, clutch and clutch release components.
Follow the link to our flywheel below for further pictures and information regarding this conversion. For further information we invite you to get in contact.
Unlike the flywheels which have a short lead time these adaptor plates are kept in stock.
Note to international buyers: Due to the size and weight of these items the postage cost can be as much as £40 GBP. If you place an order via the website you will automatically be charged a smaller amount for postage costs but we will contact you to request the difference. You are welcome to contact us first for a more accurate price before ordering. Thank you, EFI Parts.


